Laravel is a PHP Open Source framework accomodating Model-View-Controller (MVC) architecture. At the moment (2018) Laravel has reached version 5.6. In this basic tutorial, we will create a simple CRUD. Later we will create a table with only four columns, the id, name, created_at, and updated_at.
Before we begin, laravel should have been installed in your pc environment. Refer to the official website for installation instruction.
Take note that we are using the latest Laravel version 5.6 in this tutorial.
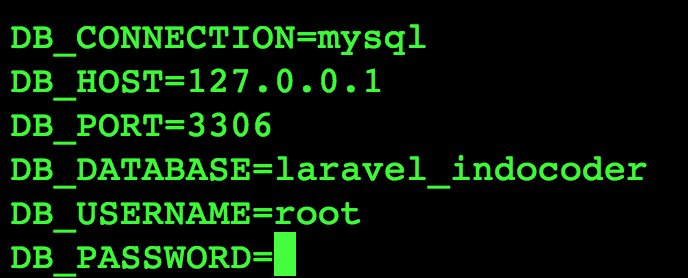
Step 1 – Setting the Database in .env
Once you’ve finished laravel installation, go to .env file and do some modifications. You also need to create your database first. For example, my database name is laravel_indocoder.
Step 2 – Generate Model, Migration File, and Employee Table
We are about to create employee table. This table has 4 field : id, name, created_at, and updated_at. Open terminal or command prompt, go to htdocs folder if you use XAMPP/LAMPP, and type this command :
|
1 |
php artisan make:model Employee -m |
Two files will automatically appear :
- app\Employee.php
- database\migrations\…create_employees_table.php
Open create_employees_table.php and add ‘name’ inside the up() function.
|
1 2 3 4 5 6 7 8 |
public function up() { Schema::create('employees', function (Blueprint $table) { $table->increments('id'); $table->string('name'); $table->timestamps(); }); } |
Save the file and do the migration with the following command in your terminal :
|
1 |
php artisan migrate |
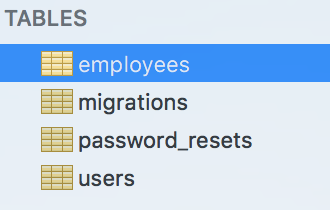
If we see our database, four tables will appear :
Step 3 – Create Form View
Next we will create a form to add employee name. Create new file create.blade.php inside resources/views folder.
|
1 2 3 4 5 6 7 8 9 10 11 12 13 14 15 16 17 18 19 20 21 22 23 24 25 26 27 28 29 30 31 32 33 34 35 36 |
<!-- create.blade.php --> <!DOCTYPE html> <html> <head> <meta charset="utf-8"> <title>Tutorial CRUD Sederhana Laravel 5.6 </title> <link rel="stylesheet" href="{{asset('css/app.css')}}"> <link href="https://maxcdn.bootstrapcdn.com/bootstrap/3.3.6/css/bootstrap.min.css" rel="stylesheet"> <link href="https://cdnjs.cloudflare.com/ajax/libs/bootstrap-datepicker/1.5.0/css/bootstrap-datepicker.css" rel="stylesheet"> <script src="http://ajax.googleapis.com/ajax/libs/jquery/1.9.1/jquery.js"></script> <script src="https://maxcdn.bootstrapcdn.com/bootstrap/3.3.6/js/bootstrap.min.js"></script> <script src="https://cdnjs.cloudflare.com/ajax/libs/bootstrap-datepicker/1.5.0/js/bootstrap-datepicker.js"></script> </head> <body> <div class="container"> <h2>Employee List</h2><br/> <form method="post" action="{{url('employees')}}" enctype="multipart/form-data"> @csrf <div class="row"> <div class="col-md-12"></div> <div class="form-group col-md-4"> <label for="Name">Name:</label> <input type="text" class="form-control" name="name"> </div> </div> <div class="row"> <div class="col-md-12"></div> <div class="form-group col-md-4" style="margin-top:10px"> <button type="submit" class="btn btn-success">Submit</button> </div> </div> </form> </div> </body> </html> |
Step 4 – Create Route and Controller
Next step is to create the route and the controller in order to redirect the page when we enter the url in our browser.
To add a new controller, type this command into your terminal :
|
1 |
php artisan make:controller EmployeeController --resource |
The new controller that has just been added will appear inside app\Http\Controllers folder.
Next, open web.php inside routes folder and add the following code on the last line :
|
1 |
route::resource('employees','EmployeeController'); |
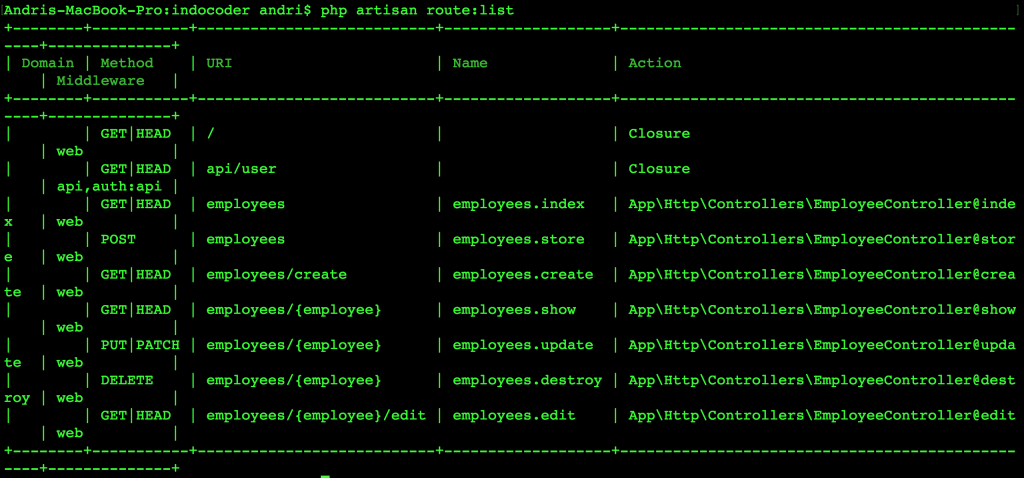
Save the file. If you want to see what are the routes that you have for your application, type this command :
|
1 |
php artisan route:list |
Open EmployeeController.php and add the following code inside public function create() :
|
1 2 3 4 |
public function create() { return view('create'); } |
This code will render your page to create.blade.php.
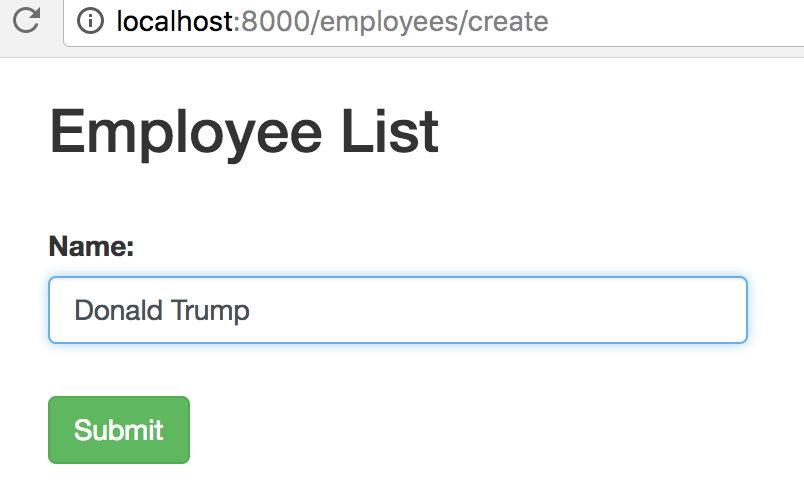
Type php artisan serve to your terminal, and head over to the following url :

Step 5 – Store Data into SQL Database
To save the date from the form into the database, add the following code to EmployeeController.php under public function store() method :
|
1 2 3 4 5 6 7 8 |
public function store(Request $request) { $employee = new Employee(); $employee->name = $request->get('name'); $employee->save(); return redirect('employees')->with('success','Employee has been added'); } |
Don’t forget to add the Employee model path under the namespace :
|
1 |
use App\Employee; |
Reopen the previous url and add some name inside the form then Submit :
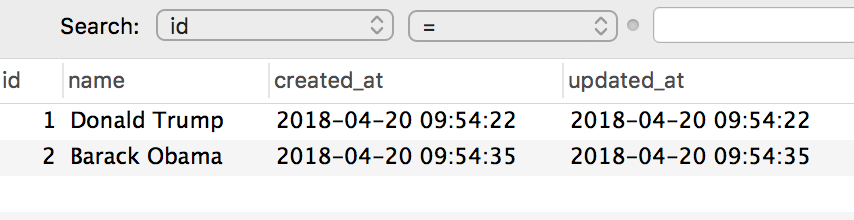
Open your database, the names will appear in your database :
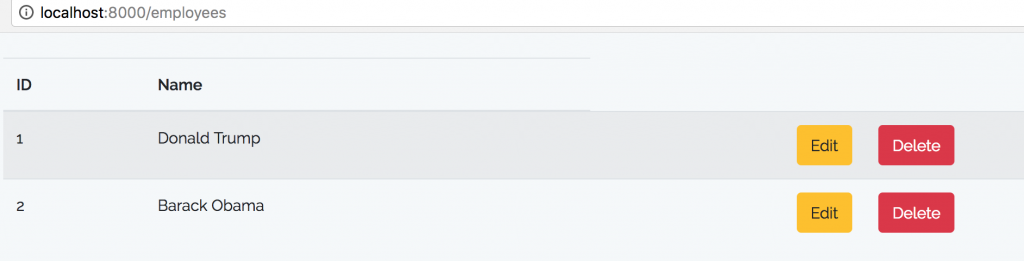
Step 6 – Create Employee List View
Open EmployeeController.php and add some code to public function index():
|
1 2 3 4 5 |
public function index() { $employees = Employee::all(); return view('index',compact('employees')); } |
Create new file index.blade.php and save it inside resources/views folder :
|
1 2 3 4 5 6 7 8 9 10 11 12 13 14 15 16 17 18 19 20 21 22 23 24 25 26 27 28 29 30 31 32 33 34 35 36 37 38 39 40 41 42 43 44 45 46 |
<!-- index.blade.php --> <!DOCTYPE html> <html> <head> <meta charset="utf-8"> <title>List Employee</title> <link rel="stylesheet" href="{{asset('css/app.css')}}"> </head> <body> <div class="container"> <br /> @if (\Session::has('success')) <div class="alert alert-success"> <p>{{ \Session::get('success') }}</p> </div><br /> @endif <table class="table table-striped"> <thead> <tr> <th>ID</th> <th>Name</th> </tr> </thead> <tbody> @foreach($employees as $employee) <tr> <td>{{$employee['id']}}</td> <td>{{$employee['name']}}</td> <td align="right"><a href="{{action('EmployeeController@edit', $employee['id'])}}" class="btn btn-warning">Edit</a></td> <td align="left"> <form action="{{action('EmployeeController@destroy', $employee['id'])}}" method="post"> @csrf <input name="_method" type="hidden" value="DELETE"> <button class="btn btn-danger" type="submit">Delete</button> </form> </td> </tr> @endforeach </tbody> </table> </div> </body> </html> |
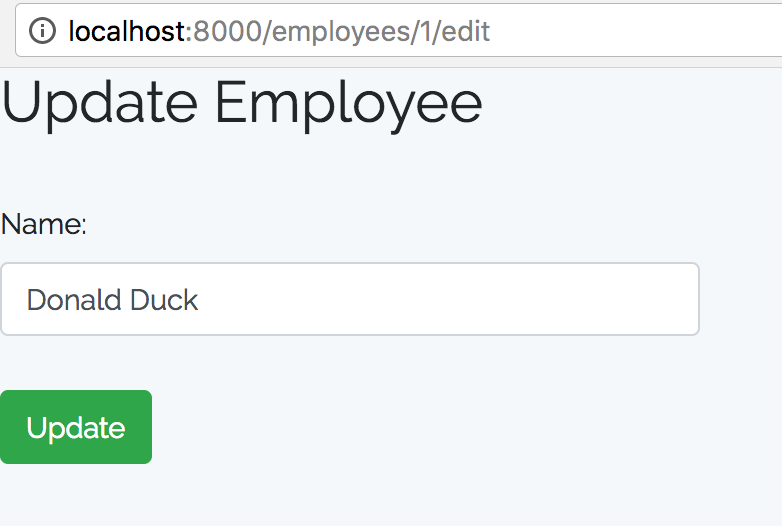
Step 7 – Edit Employee
To update the employee, open EmployeeController.php and add the following code :
|
1 2 3 4 5 |
public function edit($id) { $employee = Employee::find($id); return view('edit',compact('employee','id')); } |
And create a new file edit.blade.php inside resources/views folder :
|
1 2 3 4 5 6 7 8 9 10 11 12 13 14 15 16 17 18 19 20 21 22 23 24 25 26 27 28 29 30 31 |
<!-- edit.blade.php --> <!DOCTYPE html> <html> <head> <meta charset="utf-8"> <title>Laravel CRUD - EDIT </title> <link rel="stylesheet" href="{{asset('css/app.css')}}"> </head> <body> <div class="container"> <h2>Update Employee</h2><br /> <form method="post" action="{{action('EmployeeController@update', $id)}}"> @csrf <input name="_method" type="hidden" value="PATCH"> <div class="row"> <div class="col-md-12"></div> <div class="form-group col-md-4"> <label for="name">Name:</label> <input type="text" class="form-control" name="name" value="{{$employee->name}}"> </div> </div> <div class="row"> <div class="col-md-12"></div> <div class="form-group col-md-12" style="margin-top:10px"> <button type="submit" class="btn btn-success">Update</button> </div> </div> </form> </div> </body> </html> |
Next, modify public function update() inside EmployeeController.php
|
1 2 3 4 5 6 7 |
public function update(Request $request, $id) { $employee= Employee::find($id); $employee->name=$request->get('name'); $employee->save(); return redirect('employees'); } |
Click edit on your Employee List and then click Update :

Step 8 – Delete Employee
To delete an employee, modify public function destroy() inside EmployeeController.php
|
1 2 3 4 5 6 |
public function destroy($id) { $employee = Employee::find($id); $employee->delete(); return redirect('employees')->with('success','Employee Has Been Deleted'); } |
